"Welcome to 'The Jot Pot', my admiration of all things inspiring, food, art, and parts of my daily life."
Showing posts with label cooking. Show all posts

Thursday, March 26, 2015

salsa time

What could be more freshening than a homemade salsa sauce dip to snack on late in the afternoon? Here's the recipe:

- 3 red ripe tomatoes, remove seeds and chop finely
- a quarter of a green pepper
- 1 red onion
- 2 cloves of garlic
- 1 tablespoon of olive oil
- 1 tablespoon of lemon juice
- salt and pepper

Chop all ingredients finely then mush all together in a bowl. Season to match your taste then let it rest more than an hour to allow all the flavors to combine. I prefer to chill the sauce in the fridge and eat it cold. I find it more refreshing with those plain salty corn chips. 

Saturday, June 7, 2014

shrimp & chicken siomay


My first attempt in making siomay looked like this and tasted real good. I must say that the peanut sauce wasn't as successful but at least now I have learnt the lesson. I reviewed several recipes and then ended up with this recipe but substituted the fish to chicken and shrimp. Until you try, you will never know that making siomay is that easy. Go have a try!

Wednesday, February 22, 2012

teatime today

I made myself a large pyrex bowl of macaroni and cheese today. It was disturbing my mind last night so I thought I had to make it ASAP. It was the perfect match for my tea and such a comfort for my not so comfortable day. Now I know why it's called comfort food. Below is the recipe:
Ingredients
4 handfuls of elbow macaroni
1 big onion, 2 garlics
Half a can of corned beef
1 1/2 little carton of milk for the roux
2 table spoons of flour for the roux
Margarine
Half a box of cheese, grated
Season with salt, pepper, sugar
Bread crumbs for the top
How to make: Cook the pasta until soft in boiled salted water. Chop up the onion and garlic, cook in margarine till soft and add the corned beef. Season and turn off heat. Put in 3 spoons of margarine in another pot and add the flour while stirring consistantly. Add the milk little by little until the liquid forms a thick paste. Add the cheese and pepper, mix, turn off heat. Drain the macaroni, then add to the corned beef pan and mix thoroughly. Place in a pyrex bowl. Pour in the roux until blended well with the macaroni and add lots of bread crumbs on top. Bake for 40 minutes for a nice golden brown top. Yumm-O!

Thursday, February 2, 2012

pizza party

 
Last weekend, we were invited to a pizza party. It was actually a kid play-date with a theme :) Amesh from Dreamesh hosted and made the kids creative aprons from dishtowels with their initials on it. See her tutorial here. She also prepped the kids with pizza shaped cookies ordered here and free downloadable pizza templates form here. Amesh is such a prepared momma when it comes to hosting a themed gathering ;) I bought along some of my home made pizza sauce and pre-dough, so that it wouldn't take much time to bake and the kids could help us prepare the pizza before baking them. Unfortunately, the kids were not as excited to play with the real pizza's and dug for the imitations instead :) Talking about this pre-dough pizza, its really good though for quick fixes. First, they come in mini size (suitable for party food), personal panned size (just enough for a brunch portion), and a medium size, and they turn out nice and crunchy if well cooked. I bought the minis for the kids and the personal panned size for the adults. Too bad not everyone came so there were left-overs, but happily eaten anyway. At the end of the afternoon, the kids had fun, the parents were (quite) full. It was a fun day!
Images: by Amesh 

Wednesday, December 7, 2011

spring rolls #CPP1

To be honest, I've made spring rolls several times already,  also for my Icip-icip article at CosmoGIRL! once, but never got them looking just right. This time I did *big grin*:) I found out that you have to put in quite an amount of filling to make sure your spring roll stays a solid round tube shape. Before, mine always turned out a flat rectangle shape - not fun. Now, because of the camera being unavailable, I made use of what I captured with my phone camera, played around with it on photoshop and made my own spring-roll-set-image. A clap or two for the effort, please? :) Here's my most preferable recipe after former attempts:
My filling: 
- 2 big handfuls of beansprouts
- quarter of a cabbage, thinly sliced
- 2 large carrots, thinly cut into matchsticks
- 4 onion leaves, chopped
- 1/4 kg Minced beef
- oyster sauce 
- 12 spring roll/ lumpia sheets (available in the frozen section in supermarkets)
How I make: Put in two table spoons of oil in to a pan and stir the minced beef until cooked. Add in all the veggies until soft. Season with oyster sauce and mix well together. Taste. You can add salt and pepper to meet your taste, but usually oyster sauce does it right. Transfer mix in a bowl to cool. Prepare the wrappers and one egg white. When cool, add a table spoon and a bit more of filling to the wrapper and slowly roll into a tube while tucking the sides in and securing with egg whites. While wrapping, prepare oil in a pan to deep fry so the rolls can be immediately fried once done. Easy and tastes even more delish with this specific chili sauce, Sambal Bangkok. Happy munching!

Tuesday, December 6, 2011

spicy tofu #CPP1

I shall say this dish is great in many ways. It's healthy, simple, tasty and cheap :) I'm glad I found and mastered this recipe. Here's the video along with the recipe. I cut my tofu bigger than the ones in the video as I used the softer kind of tofu rather than the really firm kind. That way, the soft tofu would not easily break in to pieces. Both I'm sure taste as yum. At least now I can assure you that my tofu dish will not be the ordinary fried version. Many must agree with me that sesame oil and seeds makes it extra lovely.
Note: The image is not mine. My camera was snatched away by my husband to accompany him on a duty abroad. Won't be back in two weeks *sigh. The pics I attempted to take with my phone camera were awful - no bright sun light as well today. I hope I get better (phone camera) pics with the next two dishes. 

Saturday, December 3, 2011

breakfast casserole #CPP1


My next attempt was seriously easy *show off* :p All you need to do is watch this video, then change the filling to your preference. I used sausages, sweet onions, and corn. I also sprinkled bread crumbs on the top just before put in oven. Here's the ingredients I used:
- 7 slices of bread, crust removed, cut into cubes
- 2 large sausages, thinly sliced
- 1 big onion, chopped
- 2 large eggs
- 1 cup of milk
- cheese, grated
- salt & pepper & a pinch of oregano
I didn't leave it to rest overnight since I had lack of patience and made it this morning just before breakfast. Me too wandering whether the herbs would absorb thoroughly enough or not? It did and tasted delish! Maybe next time a sweet casserole with raisins and fruits might work out just as yum!

Thursday, December 1, 2011

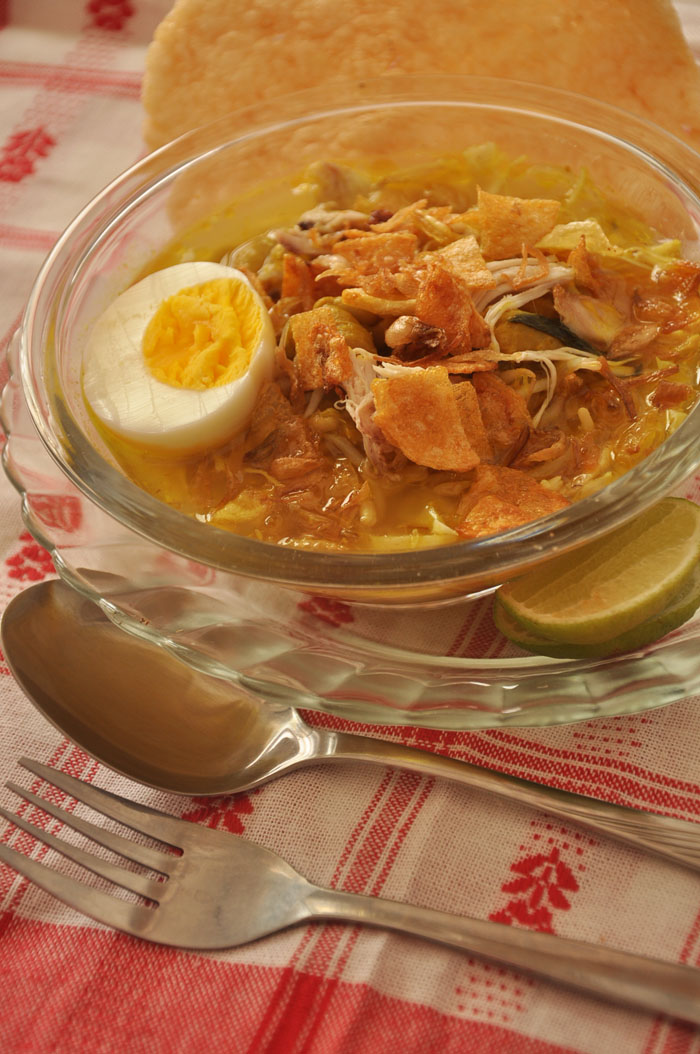
soto ayam #CPP1

I chose Soto Ayam to be my first recipe of my Cooking Project Part 1 (#CPP1) and I nailed it! I started cooking in the morning so we had this for lunch and dinner today. I followed this recipe and watched this video for a picture of how to get things started and so on. I did make a few substitutes to the recipe according to my preference. It wasn't as hard as I thought, but then maybe because I got a hand from my helper in grinding the spices. She grinds spices like a high-speed food processor :) Thanks so much, Mbak Mar! So, my kind of Soto Ayam consists of rice noodles, sliced cabbage, bean sprouts, a boiled egg, and chicken. To top the dish off, I cut in half and thinly sliced potatoes and deep fried them to go straight on top of the Soto when about to serve. It gives a crunch in every bite and potatoes goes best with Soto. Oh, don't forget the shrimp crackers! It just makes the dish even more complete. I'm glad I passed this recipe satisfyingly.  What a tasty 1st of December!

Wednesday, November 30, 2011

the cooking project part 1

Through these past days, I've been craving over food that have been hidden way back in my head. And if you're wondering, no, I'm not pregnant. I'm just going to blame this on my second round of the film Julie & Julia. I recall pulling out recipes I wanted to eat after watching the DVD. Then I thought, why not give myself a project. Plus, I need to learn to cook more various menus anyway. My dish-list consists of Asian dishes except for a breakfast casserole which looked so easy to make. So, my project target will be 5 dishes with a time span of 1 week starting from today. This includes taking a serious nice picture of each dish for proof. What's to cook (and can't wait to eat!): 
1. Lumpia sayur (vegetable spring rolls)
2. Asem-asem (sour vegetable and meat dish)
3. Soto ayam (a chicken turmeric soup)
4. Spicy tofu 
5. Breakfast casserole. 
The order of making shouldn't matter. Okay, here we go. Wish me luck!
Images: from around the web
photoshop by sheila

Thursday, August 11, 2011

ceasar salad

This has been my breaking-fast menu for these several days, after a cup of tea. It's deliciously healthy, refreshing, and dead simple :) All you need is a bunch of fresh lettuce, washed, chopped, and patted dry. For the dressing, I used 2 tablespoons of mayo, half a teaspoon of mustard, 1 small garlic chopped finely, 1 teaspoon of olive oil, salt and pepper. Mix all together before mixed with the lettuce. Make your own croutons by cutting 2 slices of bread into cubes, then bake with butter in a nonstick pan until golden brown. Serve immediately.

the perfect boiled eggs

Due to the husbands request lately, I have a new routine - boiling eggs. And you know what, it's not as easy as I thought. I tried a few times and never got the exact firmness I wanted. Always to squishy and made me have to boil them again (read: time consuming and ruined the look).  So, when I stumbled upon a post I read here, it was just the answer I needed :D All you need now is a timer and let EggWatchers do all your counting. It's fantastic!

Monday, April 11, 2011

simple home-made lasagna


It didn't last long, eventhough the pasta wasn't as soft as I thought it should be and I should have put in some more tomato puree. Speaking of it not lasting long, that's why the picture above is not my original lasgana pic, but I swear it did look something like this! :D It wasn't the red kind of lasagna because I used fresh tomatos and not ready-made tomato puree, and the mushrooms were domninant so it made the sauce kind of dark in color. The camera battery was low and the handphone pics were awful, and we were starving and couldn't wait to try ;) Enough of the excuses, here's the recipe!

ingredients:
- 6 ripe red tomatos, chopped finely (I would use 10 tomatos the next time)
- 1/4 kg minced beef
- 1 onion, chopped
- 3 galic, chopped
- 1 pack champignon mushrooms, chopped
- tomato sauce
- salt, pepper, oregano
- lasagna sheets
Mix all together in a frypan, onions and garlic first, beef, mushromms, tomatos. Leave it cooking for a while so the juice from the tomatos come out. Season with salt n pepper n herbs, mix and let it sit for a minute or two.

white sauce:
- milk
- flour, dilute with hot water before pouring into the milk
- cheese, grated
- salt n pepper for flavorPour the milk in a pan and let it bubble on the stove. Mix in the flour paste, cheese, salt n pepper. Done.

Layer the lasagna sheets, white sauce, filling in a pyrex bowl, and repeat layering. Make sure you leave a bit of white sauce for the very top and add some grated cheese before you put the dish in a preheated oven. Bake for at least 30 minutes. Cool for a while before serving :)

Sunday, January 9, 2011

classic pasta in tomato paste

This classic recipe can use any kind of pasta and meat. I used spiral pasta and minced beef. Tuna also tastes great with this dish. Here's the recipe:
Ingredients: 
- Pasta, cook according to the instructions. Put aside.
- 4 large red tomatoes, diced and mashed
- 1 large onion and 3 garlic, finely chopped 
- minced beef
- salt, pepper, sugar, oregano
- a handful of parsley, chopped 
1. Pour in 2 lugs of oil in a hot pan, saute the onions, add beef until brown. 
2. Add in the tomatoes and spices (all to meet your taste, I don't use any measurements), stir until all the juice from the tomatoes come out.
3. Throw in the parsley and mix for another minute.
4. Mix in the pasta and stir til the sauce is thoroughly mixed with the pasta.

Add some chili sauce if you want yours more spicy. I didn't add any coz this is also my kids' menu for lunch ;)

Friday, December 31, 2010

breakfast today

We had fish cakes this morning. Actually I made them yesterday and now that's the thing I like about this recipe, because you can make a lot at once and then store them frozen. Whenever you want to eat them, all you need to do is defrost and fry. Though this is my first try, I was happy with the results. What was missing was the lemon zest since I didn't have lemon anywhere in the fridge. I got my recipe here but substituted the salmon to snapper fish and added bread crumbs to the outer side of the cake. I used an easier step to Jamie's way of doing it. Instead of boiling the potatoes separately, I steamed them all together with the fish. I think I saved time there :) I think this is a great (meaning simple and super easy) way to cook fish, plus children love it. Willing to try? Do! Oh yeah, have a great new years eve!

Monday, December 13, 2010

sunday brunch


An easy recipe - without having to use the oven. Now that's because I used ready made pizza dough ;) It's for brunch, you have kid, the husband is at home, you have to make things easier and simple, right? Ha ha ha... Easy peasy said, here's the recipe:
- 1 onion, chopped
- 4 white onions, smashed and chopped (for more flavor)
- 1/4 kg minced beef
- half a cup of mushrooms, chopped
- 3 large red tomatoes
- tomato ketchup, oregano, pepper, salt, to match your taste.
1. Saute the onions in 2 tablespoons of oil for half a minute then add in the beef until meat turns brown. Throw in the tomatoes and ketchup, then leave to soak a few minutes until all the juice from the tomatoes come out. Add the mushrooms and herbs, toss and turn for another 5 minutes. Set aside.
2. Poke both sides of pizza dough with a fork then spread with margarine. Add the topping and top with grated cheese. Do so til all pizzas are done.
3. Use a deep frying pan with a lid to substitute using an oven. Spread pan with margarine, heat the pan, put in pizzas, put the lid on, then bake for about 5 minutes. Once the bottom of the dough turns golden brown, you're done. Et voila! Told you it was easy :)

Sunday, May 30, 2010

lunch on sunday

 /

Just like the ones you order at a restaurant - crispy on the outside, yet juicy on the inside. It's spicy chicken wings and it's easy, peasy, japanese-y. The secret: Sasa Tepung Bumbu Ayam Spesial. This in kind of a guilty pleasure since I have always tried my best to avoid all instant spices. But sorry, I can't resist this one. This is my second go and it tastes sooo good. Plus, it takes only half an hour and you're done! Definitely a solution today when the baby wouldn't take his nap and the nonstop crawling everywhere:)
A tip from me is to not overuse the spice. If you cook half a kilo of chicken, then use half the amount of spice in the pack. Don't force the whole package to get extra flavor coz it will taste tangy. Happy Sunday!

Monday, May 24, 2010

fluffy pancakes


Finally, I found the perfect recipe for the fluffiest pancakes. My pancakes never were this soft until I found "The Secret". When I tried it out last Sunday, I was thrilled that they were actually fluffy! The mister, being the pancake lover he is, gave it an A :) We had our pancakes with chocolate, vanilla, and mocca flavored ice cream. Yumm-O! Here's the recipe:  
1 cup all-purpose flour
1 tablespoon sugar
2 teaspoons baking powder
1/2 teaspoon salt
1 egg
3/4 cup milk
1/4 cup shortening melted

First,  throw in the flour, sugar, baking powder and salt, then add all the wet ingredients - egg, milk and shortening and stir them into the dry ingredients until you get a moist, even, and thick  pancake batter. Be sure that the batter is a little difficult to pour on your pan, because the pancakes will be fluffier.
Pour the batter on to a hot nonstick pan and cook the pancakes on low heat. Since the batter is thicker don't use to much heat because your pancakes will turn brown on the outside and will still not be done in the middle. Turn the pancake around when bubbles form on top of it and then cook until the second side is golden brown.

"The Secret" for extra fluffiness:
1. Sift the flour.
2. Separate the egg whites from the yolk and beat them until they turn to white creamy snow. Then follow the fluffy pancake recipe except don't add the egg whites to the batter. Only when the batter is mixed and ready slowly and gently stir in the egg whites. 
3. Substitute some milk (1/4 cup) with mineral water.
You'll know if your pancakes are fluffy or not by the texture. The more little bubbles form in the pancake, the more fluffier they are. Try it out! You'll love the results :)

Tuesday, December 29, 2009

miss dahl

As in Sophie Dahl the granddaughter of the Roald Dahl. She has a cookbook! Miss Dahl's Voluptuous Delights. I'm out of date I know, cause the book has been published this year (and the year is about to change), but I want one! Better late than never, right? I'm weak when it comes to nice book covers. I mean just look, the girl is pretty, the setting is pretty, and not to mention the photos inside. That's enough thought put in to grab the book, don't you think? Hihi...